Sheds and Storage
Recycling Rainwater |
||
 |
|
|
 |
With a 75mm system the downpipe would have to go directly into the water butt through the water butt lid. |
|
 |
There is an easier way to collect your rainwater for the garden. Read on! |
|
Installing Rainwater Gutter and Fittings |
||
|
To allow the water to flow along the gutter to the downpipe it needs a certain amount of fall. Fall is calculated as 1:600 [e.g. over a 5.0m length, 5.0m ÷ 600 = 8.3mm], this means the last bracket will be 8.3mm lower than the first bracket, at the end of the 5.0m length. |
||
 |
1. Fix first support bracket to fascia, under roof line. Run string line to the other end. |
|
 |
2. Fix stopend outlet when fall has been calculated. |
|
 |
3. Fix remaining support brackets in position along string line at spacings stated. Fix support brackets with galvanised or bright zinc plated No. 10 screws [prevent rusting] |
|
|
1.0 metre bracket spacings for 112mm system 0.5 metre bracket spacings for 75mm system |
||
 |
Downpipe clip spacings 2.0 metre for 112mm system 1.0 metre for 75mm system |
|
Installing a Rain Diverter |
||
|
Only available to use with a 112m Rainwater System. For a 75mm Rainwater System direct downpipe through the lid of the water butt. |
||
 |
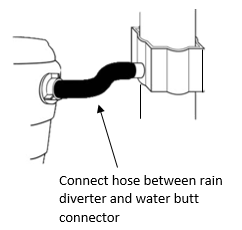
Push rainwater connector through washer from inside. Tighten nut on outside to form a seal. |
|
|
If using a stand, place water butt on it facing the downpipe. |

|
Fit rain diverter with square end upright and cut section of downpipe or fit in line with flow arrow on fitting. |
||
 |
The butt will fill within 10mm of the top. When full the water will continue to flow and exit at bottom of downpipe. |
|
|
If water butt overflows - raise water butt If water level too low - lower water butt [in case of low water level, ensure sufficient rain has fallen to fill the water butt] |


